Recently, we began a new activity within Amplified where a senior developer gives a presentation on a specific topic to the rest of the team. Our first-ever “Tech Talk” focused on small pull requests: what they are, why they benefit our team’s workflow, and how to create them.
We always recommend that our team create small pull requests (PRs). That’s because, in practice, there’s no simple code, only simple bits of code. Your code is a graph of logic, and the more complex the graph, the harder it is to follow. It’s hard to say an entire feature will work, but it’s much easier to say one small part will, and go from there.
Understanding why we want to create small PRs, how do we do this and what is considered “small” for a pull request?
First, let’s define a small pull request. 1–2 screens of dense diff is small enough for one person to process at once. If there’s enough white space, you could do up to 3–4 screens. If you do choose to make it longer, the code should be fairly easy to understand: a simple switch case, a list of constants, enums, a list of interfaces.
Ultimately, there’s no hard definition, but the above are good guidelines.
So, how do you create a small pull request?
Creating PRs should start at the very beginning of your feature planning and implementation process. If you still ended with a large PR, you’ve made a mistake in planning ahead, but it’s still salvageable. Let’s explore 2 scenarios and how to create small PRs in each.
First of all, you can’t take a 3-day task and create a PR from it. Instead, break down a task into small tasks that can be completed in a few hours and create a PR from that. This way, each task will actually be a collection of small, manageable PRs.
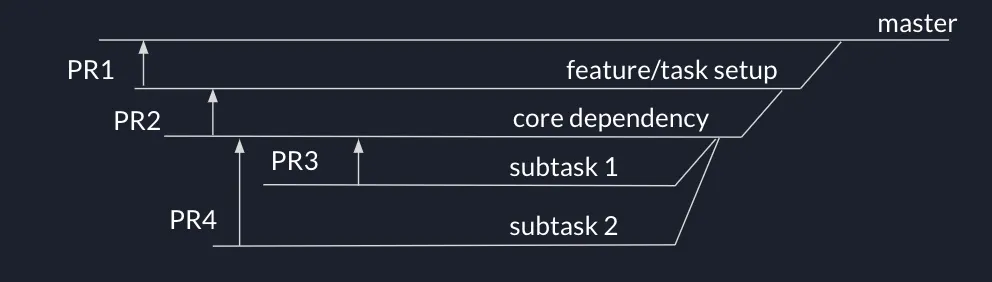
But what about dependencies? In the case of dependencies, branch your master into all its subcomponents, and your branches become PRs. Break down your features into dependencies, and your dependencies into subtasks. Each of these becomes a PR.
For example:
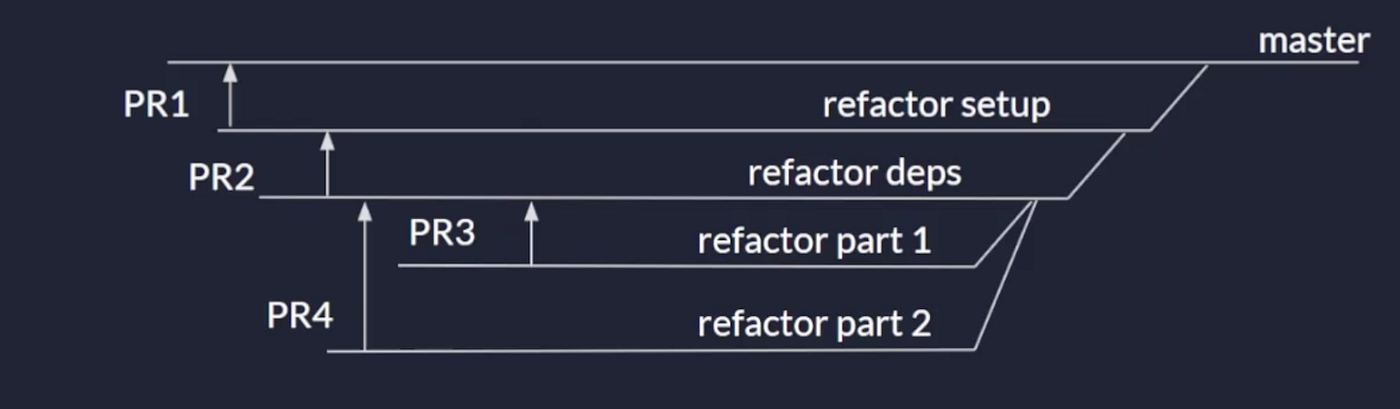
In the case of big refactors on existing code, the same concept applies. You’ll start with your refactor setup, which is one PR, then create branches off of that.
For example:
If you’re not doing a lot of work, but just a file with a few hundred things, or you’re only moving things around in one file, that’s small enough for one PR and doesn’t require multiple branches.
This is where supergit comes in handy.
If you already have commits for smaller pieces of work, you can make a different branch, cherry-pick each commit that you need from the previous branch, then do PRs from that branch. Then, keep making more branches.
If you don’t have commits, do a soft reset on your branch. All the work you have committed, if it’s a big lump, will become staged.
Here’s what it looks like with git commands:
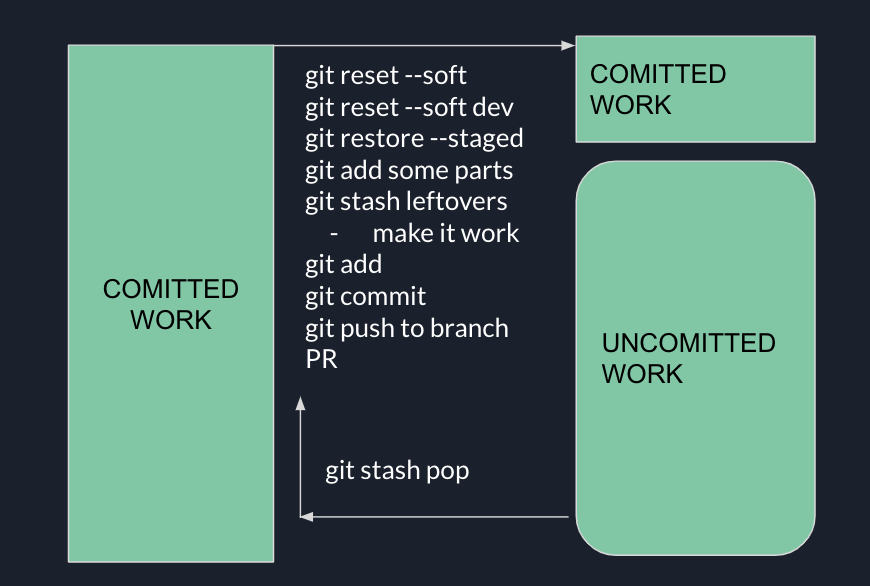
This process is definitely a last resort, however, one that we use if we haven’t created small pull requests from the beginning. Integrating small pull requests into your process will streamline your process, and the testing and review process, making your work faster and smoother.
Like all things related to software development, there’s no one-size-fits-all. Find the workflow that works best for your specific case while staying organized and avoiding bottlenecks.